|
In the radon testing and radon mitigation industry, we deal a lot with customers who are in the midst of a real estate transaction. This is so because the home inspection is many times the first time the seller of the home has ever conducted a proper radon test. As deadly as elevated radon levels can be in residential homes, public awareness about its dangers is still very low. Both buyers and sellers tend to get overwhelmed about elevated radon test results during the inspection of the home, but we can help you make the process go as smoothly as possible. To help you decide what actions you need to take to keep you safe in your new home, here are the 5 things you need to know about radon before buying. 1.RADON IS A SERIOUS HEALTH HAZARD:  Radon gas is a Class A carcinogen, which means it is known to cause cancer in humans. Radon is actually the second leading cause of lung cancer in the US, only second to smoking. In non smokers, radon is the #1 cause of lung cancer. Humans are not the only ones affected by radon either, pets can develop lung cancer from radon gas as well, and are actually more susceptible to the effects because of their increased breathing rates. In either case, the effects of radon gas are not something to scoff at or ignore. Every homeowner should be aware of the effects of radon and how to monitor and control it in their home. Where does radon come from you might ask? Radon comes from the natural decay of uranium in the soil underneath your home. As the gas rises to dissipate in the air, the presence of your home blocks it from venting so it becomes trapped. Due to the pressure differential between your home and the soil underneath, radon can get drawn in through cracks in the floor, the sump crock, or even simply the pores of the concrete. Once inside, radon tends to build up in the lower levels of the home due to its density, and because of how long it takes to decay, radon can build up to unsafe levels throughout the living space. 2. RADON IS A FIXABLE ISSUE IN ANY HOME  If the home you're buying does test high for radon gas, as scary as that may be, it should not deter you from buying the home. Elevated radon gas levels can be fixed in any home by installing a proper radon mitigation system. At levels of 4.0pCi/L or above, a radon mitigation system is recommended in the home, but don’t fret if the current levels are substantially higher than that. We have found that even homes with levels as high as 80-100pCi/L can be brought below 4.0pCi/L with a custom designed radon mitigation system. Our most typical retest results for residential homes fall below 2.0 and many coming even below 1.0. There may be many different factors that you consider when deciding whether or not to buy a certain home, but due to proven removal techniques, radon gas shouldn’t be one of them. 3. THERE ARE MULTIPLE OPTIONS FOR MITIGATION: 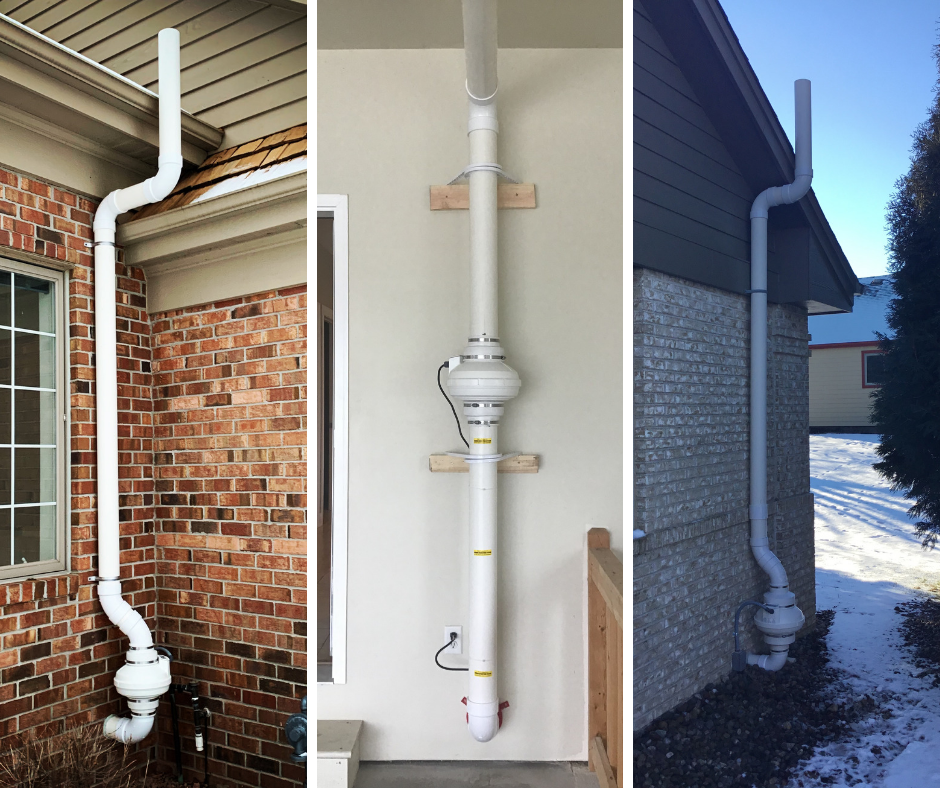 We find that a lot of home buyers worry about the aesthetics of a radon mitigation system because they have seen other radon systems online or in their neighborhood that they didn’t like. While we agree that white PVC piping and a fan might not be the most ideal object to be placed on the exterior of your home, that doesn't mean it can’t be hidden. Homes with an attached garage can usually be fitted with a garage style radon mitigation system. Garage style radon mitigation systems have the piping and fan run from the basement, into the garage and then through the roof. A garage radon mitigation system, if possible, is the most aesthetically pleasing option for radon mitigation. Obviously, every home cannot be fitted with this style of system, but even if an exterior option is the only way to go, there are usually multiple options as to where the system can go on the exterior. We always work with our clients to find the spot on their home they are most comfortable with, so if the home you are buying needs a radon mitigation system and has to be installed before you move in, it is a good idea to be there on the day of install if possible. 4. WATCH OUT FOR RADON TESTING FRAUD  Unfortunately in the radon industry, we see a lot of radon testing fraud. Some homeowners want to avoid the possibility of ever having to install a radon system themselves even if it means lying to the buyers, endangering their health. You can even see the prevalence of this by looking at how many people search Google for questions such as “how to pass a radon test” or “how to fool a radon detector”. Radon testers are not completely tamper proof and cannot be watched for the full testing period by a professional, so during the testing process, we’ve seen sellers open windows, or even move the test to the top level to make sure it comes back low no matter what. There isn’t a lot that can be done about this, however it is an important thing to be aware of. If you have a test done by an inspector and then the seller conducts their own test with a much different outcome, it may be time to question the results. Additionally, the EPA recommends testing every two years, so if the results are low when you buy, you should still have another test conducted soon after moving in. 5. GOING CHEAP CAN END UP BEING EXPENSIVE:  Not being a part of the installation of a radon mitigation system for the home you are buying can end up being costly for you. If left up to the sellers of the home, they may choose the cheapest option just so they can get it done and get the closing over with as soon as possible with the smallest cost to them. Quality radon mitigation systems installed by certified and experienced contractors should cost anywhere between $800 and $1500. If you see a quote below that, you may be getting a low quality system in the end. Radon mitigation systems that are installed improperly or installed without proper permits being pulled for electrical (if needed), can cost you a lot down the road. The costs that can ensue after a poor installation include but are not limited to; fines from the city, service call costs to fix unsatisfactory work, time wasted by trying to contact the company for service, or even the cost of having the system removed and an entirely new system installed to get it to code or working as it should. Try to be a part of the mitigation process with the sellers of your home, and check reviews as well as company history before making a decision. We have fixed far too many improperly installed systems over our 21 years in business. If you are going to have mitigation done at your new home, make sure it’s done right the first time. Andrew KreklowLifetime Radon Solutions
4 Comments
 The process of radon mitigation within residential structures is generally a simple concept. For the vast majority of homes in Wisconsin and the rest of the midwest, some form of sub-slab depressurization is the most effective way to reduce radon levels within the home. That is, either depressurizing the drain-tile system or depressurizing the soil/material beneath the slab when no drain-tile is present. The reason this concept works so well is that the negative pressure differential between the home and the soil beneath the home is the main cause of the “vacuum” that draws the radon into the structure in the first place. Many times this pressure differential is caused by natural occurrences (like barometric pressure changes, wind, etc.) and other times human actions (like heating the home, running exhaust fans, etc.). In more simplistic terms, since radon is a gas derived from uranium particles in the soil, when the home “breathes” it releases air out and ultimately has to replace that air with new air from outside the structure. During this process, the home can draw in new air from beneath the slab (many times with high radon concentrations), into the structure where it is encapsulated and can grow to more dangerous concentrations over time—much greater than the highly diluted outdoor air. By “overriding” the natural pressure changes and human originated pressure changes (through the use of a proper radon fan), the radon system will ultimately draw the radon into the exhaust piping rather than into the structure. This concept of sub-slab depressurization is also effective because it stops the radon before it enters the home in the first place. Again, in layman’s terms, by using a PVC venting system powered by a specifically chosen radon fan (ultimately creating a vacuum under the slab), we can override the natural pressure differential that is present and ultimately draw the radon into our piping, rather than into the structure, and property reroute it to vent above the roofline (so there is little to no chance of reentry into the home). Some homes have different foundation styles or may contain crawlspaces, and in that case, a similar depressurization process is used—only the process involves sealing the crawlspace with vapor barrier and drawing the air from beneath the vapor skin rather than beneath a concrete slab. Although the process or concept is rather simplistic, the implementation and installation can become complicated. The following information is how I explain to customers the biggest misconception surrounding radon system installation nearly every time I do a radon installation quote...  Most every time I enter a home to do a radon mitigation system installation quote, I ask the customer to start things out by showing me where the sump pump is, or ask if there is a sump pump/sump crock at all. I do this for a few different reasons but mainly because I can generally identify if there is drain-tile present, how the drain-tile is run, what kind of drain-tile is present, and whether or not there is a submersible sump pump or a pedestal-style sump pump present. Nearly every time we get to this part of the process, the conversation comes up about system placement and the biggest misconception about radon mitigation in residential properties is brought to the surface. That is, most every homeowner I speak to thinks that the radon system MUST come out of the sump crock. This belief is false. We do not have to run the radon system out of the sump crock. That is simply one way to install the radon system and in most situations it is not the preferred method of installation for these 3 reasons: 1. Generally the sump crock is in the front corner of the home and because of that, system placement and aesthetics for exterior placement is not preferred. 2. Many times the sump crock is a busy area—meaning you have multiple pumps and pipes exiting in this area and there may be hoses from dehumidifiers or other appliances running into the crock in this area, etc. Therefore, adding another pipe into the closed or sealed radon cover may overcomplicate things if the customer needs to change their sump pump in a hurry. 3. Sometimes, depending on sump placement, there may be code issues that preclude the contractor from placing the system in this area (this could be its own post entirely, so for the sake of keeping on topic we will keep this point general). 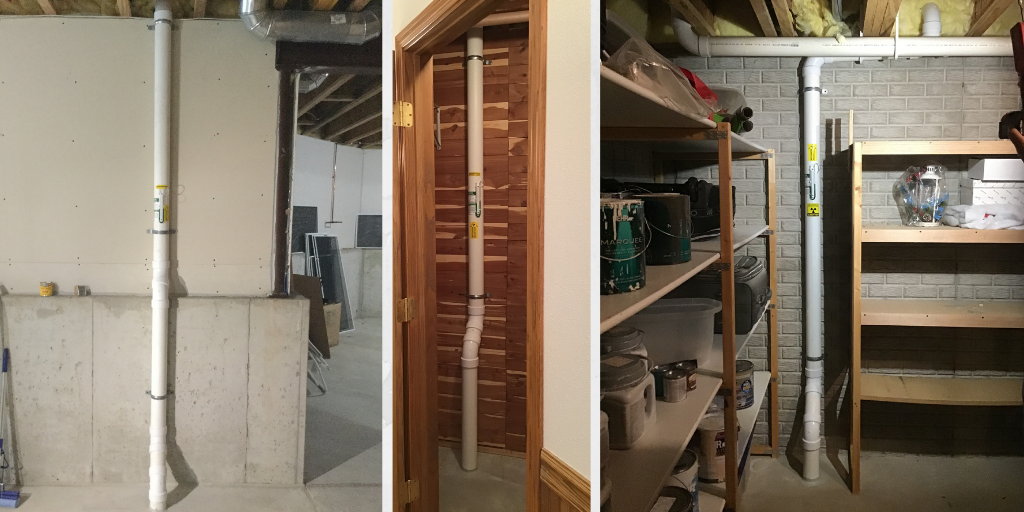 Examples of radon mitigation systems starting straight out of the drain-tile. There are really only 3 reasons that I do recommend to install the radon system out of the sump crock. Those reasons are as follows: 1. We prefer to run directly out of the sump crock if the customer has a very active sump pump/drain-tile system. If the sump is continuously running, that generally means that the drain-tile is full of water. Since the drain-tile is used to pull air through the system, the existence of water will preclude the system from operating effectively (if we tie into the tile directly, and it is full of water, it is difficult/impossible to pull air/gas through water). By utilizing the sump as the collection point, the system will be more effective because the water pressure will force any soil gasses and air into the sump basket and the fan will of course remove those soil gasses and vent them properly above the roofline/gutter-line. 2. If the customer or current homeowner has had drain-tile work done and the basement company that completed the work voids the warranty if we connect into the drain-tile directly, then we would of course prefer to run out of the sump crock to ensure the customers warranty remains intact. 3. If the homeowner or customer is not sure where the drain-tile runs (depending on the age of the home, the builder, or a multitude of other reasons, the drain-tile may not go all the way around the structure or may not run next to the footing-sometimes referred to as a “spider system” because the system may have several “legs” and/or resemble a spider from an arial point of view). In this case, it may make sense to use the sump pit as the collection point. Further, it doesn’t make sense to drill holes into the customers slab to try and find the tile (this is of course both damaging and time consuming) and usually it is much easier to just simply depressurize the sump, test pressure field extension (the area beneath the slab where the fan is able to pull air through the sub- slab material and ultimately show a negative pressure differential on a micro- manometer) or retest the radon levels, and if the PFE is not proper or if the levels are not properly reduced, then the technician can add another drop point to increase the pressure field extension. Many times, this happens when the home was built before modern building codes were present or if the individual that built the home did things “their own way." It is important to understand that piping directly out of the sump crock is a necessary and effective means to achieve proper radon mitigation but certainly not the only means. However, the above information explains why it may make sense to pursue this method and why it may make sense to seek out other routes for your radon abatement system. Most customers prefer their systems to be run to areas outside of the home that are hidden or out of plain site. Moreover, homeowners with ranch style homes or homeowners with attached garages (with no living space above) may prefer for the system to be run through a closet or up through the garage and eventually vent out of the roof of the home. In these cases, depending on sump crock placement, it usually makes sense for the system to run directly out of the drain-tile to achieve this placement rather than out of the sump itself. That is, running horizontal pipe for 10, 15, or 20 feet out of the sump and across the basement to get to the chosen area outside, in the garage or up through a closet, etc. may deem the system ineffective because of reduced/inhibited airflow or other detrimental flow metrics. Additionally, it would be more laborious, more expensive and most likely more intrusive/obtrusive to run 3 or 4 inch PVC across the basement. Therefore, utilizing the sub-slab piping that is already present and ultimately hidden from the living space is much more practical and effective because it allows for a more direct venting route while still achieving the aesthetics desired by the homeowner. In conclusion, venting a radon system out of the sump pit or directly out of the drain-tile are both effective means of radon mitigation. The only reason the sump pit is used in radon mitigation is because of the drain-tile piping that wraps all the way around the entire footprint of the structure. It allows us to create a great pressure field extension under the home. This is precisely how a 3-inch radon pipe on one side of the home can mitigate the entire structure. Because the unseen piping underneath the slab is both open to the soil and present all the way around the entire footprint of the structure, we are able to pull air from underneath the entire structure by tying into this system. Therefore, whether we tie into the sump pit itself or into the drain-tile system directly, we achieve the same or similar result—a depressurized drain-tile system that allows us to effectively pull radon gas from beneath the structure and vent it safety into the outdoor air. Which method is best? That is determined on a case-by-case basis and is generally based on the customers preference and on the many factors listed above! Brian S ThompsonLifetime Radon Solutions |
AuthorBrian S. Thompson Archives
March 2023
|
- Home
-
Locations
- Lifetime Radon Mitigation Minneapolis
- Lifetime Radon Mitigation Milwaukee
- Lifetime Radon Mitigation Fond du Lac
- Lifetime Radon Mitigation La Crosse
- Lifetime Radon Mitigation Oshkosh
- Lifetime Radon Mitigation Eau Claire
- Lifetime Radon Mitigation Wausau
- Lifetime Radon Mitigation Green Bay
- Lifetime Radon Mitigation Janesville
- Lifetime Radon Mitigation Rochester
-
Services
- Radon Mitigation
- Radon Testing
- FREE Radon Testing
- Crawl Space Encapsulation
- Trichloroethylene (TCE)
- Commercial Radon Testing and Mitigation
-
Local Articles
>
- Lifetime Radon Mitigation Brookfield
- Lifetime Radon Mitigation Madison
- Lifetime Radon Mitigation Plymouth
- Lifetime Radon Mitigation Brooklyn Park
- Lifetime Radon Mitigation West Allis
- Lifetime Radon Mitigation Racine
- Lifetime Radon Mitigation Menomonee Falls
- Lifetime Radon Mitigation Muskego
- Lifetime Radon Mitigation Maple Grove
- Lifetime Radon Mitigation Greenfield
- Lifetime Radon Mitigation Franklin
- Lifetime Radon Mitigation Fitchburg
- Lifetime Radon Mitigation Whitefish Bay
- Lifetime Radon Mitigation Hartford
- Lifetime Radon Mitigation New Berlin
- Lifetime Radon Mitigation Shorewood
- Lifetime Radon Mitigation Blaine
- Lifetime Radon Mitigation Appleton
- Lifetime Radon Mitigation Whitewater
- Lifetime Radon Mitigation Cudahy
- Lifetime Radon Mitigation Germantown
- Lifetime Radon Mitigation Sun Prairie
- Lifetime Radon Mitigation Oak Creek
- Lifetime Radon Mitigation Coon Rapids
- Lifetime Radon Mitigation Beloit
- Lifetime Radon Mitigation Grafton
- Lifetime Radon Mitigation Cedarburg
- Lifetime Radon Mitigation Burlington
- Lifetime Radon Mitigation Caledonia
- Lifetime Radon Mitigation Richfield
- Lifetime Radon Mitigation Duluth
- Lifetime Radon Mitigation Brown Deer
- Lifetime Radon Mitigation Sussex
- Lifetime Radon Mitigation South Milwaukee
- Lifetime Radon Mitigation Middleton
- Lifetime Radon Mitigation Waunakee
- Lifetime Radon Mitigation Watertown
- Lifetime Radon Mitigation Mequon
- Lifetime Radon Mitigation Pleasant Prairie
- Lifetime Radon Mitigation Greendale
- Lifetime Radon Mitigation Wauwatosa
- Lifetime Radon Mitigation Glendale
- Lifetime Radon Mitigation Oregon
- Lifetime Radon Mitigation Port Washington
- Lifetime Radon Mitigation De Pere
- Lifetime Radon Mitigation Pewaukee
- Lifetime Radon Mitigation Oconomowoc
- Lifetime Radon Mitigation Manitowoc
- Lifetime Radon Mitigation Verona
- Lifetime Radon Mitigation Stevens Point
- Lifetime Radon Mitigation Fort Atkinson
- Lifetime Radon Mitigation Beaver Dam
- Lifetime Radon Mitigation Little Chute
- Lifetime Radon Mitigation Onalaska
- Lifetime Radon Mitigation Baraboo
- Lifetime Radon Mitigation Waupun
- Lifetime Radon Mitigation River Falls
- Lifetime Radon Mitigation Marshfield
- FAQ's
- Blog
- Meet the Team
- Contact
- Testimonials
- Privacy
 RSS Feed
Lifetime Radon Solutions, Inc.
Copyright © 2018
Copyright © 2018