HOW TO CHECK IF YOUR RADON SYSTEM IS WORKING PROPERLY
For the most part, radon mitigation systems do not require too much maintenance from the homeowners, however there are a few key things to look out for. There are two main ways you can monitor your radon mitigation system to ensure it lasts for a long time. The first way is to regularly check the manometer (U-tube) that should be installed on the pipe of the system either in the basement or in the garage. The second way is to re-test your home every two years with a simple charcoal radon test kit. Below, we will cover how to use each of these methods to keep your system running and your home radon free.
READING YOUR RADON SYSTEMS MANOMETER (U-TUBE)
In the video below, our own Brian Thompson explains how to read your radon systems manometer . The manometer or "U-Tube" is a required component of every radon mitigation system, so if your radon system does not have one, call the company that installed your system and have them install one for you.
|
What does the manometer measure?
The manometer measures the negative pressure that the system is getting underneath the slab. A lower negative pressure means there is less resistance and the system will be able to move a higher air volume. A higher pressure means that there is more resistance and less air volume moving underneath the home. Homes with a sump crock and drain-tile typically will show lower negative pressure readings because it is easier to move air through drain-tile than it is through the soil directly. Homes that have very tight soil such as clay or sand under the slab will show a high negative pressure reading on the manometer because those soil types provide high resistance to move air. If your manometer is reading 0 on both sides of the mineral water inside of the tube, the radon fan is no longer pulling any air from under the home. If you see this, call the company who installed your radon system. All of the companies contact information and initial negative pressure readings should be on the sticker next to your manometer on the pipe. |
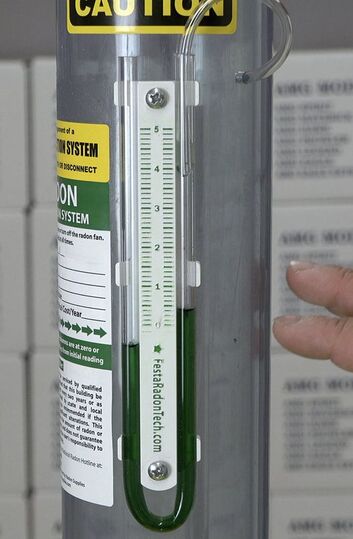
Typical Radon Mitigation System Manometer
|
RETESTING YOUR HOME
The EPA recommends testing your home for radon every two years, even if you have a radon mitigation system installed. Performing a simple radon test bi-yearly lets you know that your radon system is still performing as it should, and can let you know if something has gone wrong. There are multiple ways to re-test your home for radon, each with their own benefits.
Here are a few of your options for re-testing:
Here are a few of your options for re-testing:
Charcoal Radon Test Kits
The most cost-effective and easiest way to retest your home after your radon system has been installed is by using a charcoal testing kit. We recommend the AirChek charcoal radon test kit because it is simple to use, inexpensive, and timely with its results. In the video below, you can see how easy it is to use one of these test kits to retest your home.
Digital Radon Testing
Digital radon testing is most often used in real estate transactions because it is the fastest and most accurate way to get results. Digital testing is performed by licensed radon companies and home inspectors. With the digital test, you may be able to get retest results in as little as 48 hours. Typical pricing for digital testing falls between $100 on the low end and $200 on the high end. We recommend this testing option most for the initial testing of a home.
Continuous Radon Monitor Testing
If you are interested in constantly monitoring the radon levels in your home, you can purchase a continuous radon monitor for your home. We recommend the AirThings Wave which allows you to track your radon levels directly from your smartphone. You can check your daily, monthly, and yearly average of radon levels in your home with this device. Continuous radon monitors are not as precise as professional digital testing monitors, however they can be useful to get a good idea of what range of radon levels your home is at during any time of the year.